I've had these two questions on my blog recently about custom letterpress dies:
Why did you decide to use plates instead of handsetting the type? I was given some type when I bought my Pilot press but I am thinking of trying out the plates. It definitely seems like the easier way to get more font choices. Plus no dropped trays. (my biggest nightmare/fear)
What kind of die cuts are those? They don't look photopolymer. Do you have good success with them?
To answer these questions, first, let me address handsetting type. I don't generally handset type because, first and foremost, I don't have a lot of room to keep a wide variety of type in different sizes and fonts. Secondly, it costs a lot of money to amass the collection of type that I would want to do the things I do right now. Third, it would take forever to set and reset type on the whim of my clients. Fourth, it's a lot easier to have a custom plate made. Fifth, there are some designs that I use and that I create that are not available, so I need to make custom plates for those. Sixth, setting type is a labor of love, and while I like to do it, I would do it only for personal projects because of the time and effort it takes to handset type.
Platemaking is fairly inexpensive, although in the long run you do pay for the convenience. With type, it's a one time charge per font face and size. But I get exactly the layout and type I want, I can send electronic proofs for clients to look at and revise before I get started, and once it's done, I have the option of giving the plates to my clients for safekeeping in case I run out of room.
I don't use photopolymer plates. When I first looked into them, I didn't quite understand them (still don't, really, although I hear they are easy) and the base and photopolymer plates seemed more expensive than what I was already using. Although photopolymer plates are easier to store and you can cut them up and reset them in any number of combinations, I have heard that the impressions aren't as good as with metal plates and they degrade much faster than their metal counterparts.
I use 16 gauge magnesium plates mounted type-high on wood from Owosso Graphic Arts (see their link in the sidebar on the right). They have a same day turnaround, and through Priority Mail, I usually get the plates 3 or 4 days after I send them the digital file. I've been very happy with Owosso's service and pricing, and, as the saying goes, if it ain't broke, don't fix it!

Wednesday, August 1, 2007

Monday, July 30, 2007
Getting Serious...
So I'm on a drive to get my business jumpstarted. I've really been dilly-dallying for too long. Among the things I want to finish by the first week of August are the website and the designs and product list for ready-made products to be sold online and at craft fairs. I also need to send in (TODAY!) the last bits of paperwork to set Joie Studio up as a business. My goal is to hit the ground running by the end of August with products online to sell, a small line of customizable wedding invitations and announcements, and a game plan to take me through the upcoming holiday season.
Definitely one of the things I want to highlight and promote are wedding packages that include both letterpressed invitations and a wedding website.
Some of the things I'm pondering right now is how exactly I should set up my online shop and how many customizable products I should have, if any. I'm also wondering what kind of promotion I should do to get the word out and if I should go to any local craft fairs to not only sell my wares, but advertise my custom work as well!
Please feel free to comment on what items you would like to see me sell, any business advice, and any craft shows in the LA area that you absolutely think I need to be at to sell my letterpress paper goods!
Definitely one of the things I want to highlight and promote are wedding packages that include both letterpressed invitations and a wedding website.
Some of the things I'm pondering right now is how exactly I should set up my online shop and how many customizable products I should have, if any. I'm also wondering what kind of promotion I should do to get the word out and if I should go to any local craft fairs to not only sell my wares, but advertise my custom work as well!
Please feel free to comment on what items you would like to see me sell, any business advice, and any craft shows in the LA area that you absolutely think I need to be at to sell my letterpress paper goods!
Friday, July 20, 2007
Question About Paper Cutting
I recently saw this comment on my blog:
Anonymous said...
Your blog has been so helpful to me. Because of this blog and your helpful examples I have finally decided to take the plunge and buy a press of my very own. I was wondering do you cut your paper or do you have it cut for you? If you do your own, what do you use to cut it? Thanks!
Monday, July 16, 2007
First off, thank you for the feedback, and I'm glad that you find my blog so helpful! I do hope you find a class or a workshop near you so you get some instruction on letterpress before plunging in!
On to paper cutting. So this is not quite as simple of an answer as you would think. I try to take the lazy approach and buy pre-cut paper and cardstock, like the Fabriano, Arturo, and Paper Source cards. But every now and then, it's necessary to get the paper cut down to size. When it's a professional job that I want to have exact cuts on, I take it to a professional place. Kelly Paper charges a flat charge of $15 to cut parent sheets down to whatever size(s) you want. But that means you have to buy the paper from Kelly Paper. Kinko's charges $1.49 or something per cut per 100 sheets, and so far, they've been the best and cheapest to work with. But every Kinko's is different, so tread carefully. Do a test cut order first. It'll be worth the $5 to make sure that they can actually cut and follow directions. I had half of a ream of 220lb cardstock ruined by Office Max's Impress, and I guarantee I will NEVER be going back there to cut paper.
For smaller cutting jobs or jobs where I don't need exact precision, I use my 12" x 12" paper trimmer, which is a guillotine style trimmer. For the larger sheets, I go to Kinko's, where they have a large rotary trimmer set out for customers to use, or to my local art center/school, where they generally have larger paper trimmers set out for students to use.
I hope this helps!
Anonymous said...
Your blog has been so helpful to me. Because of this blog and your helpful examples I have finally decided to take the plunge and buy a press of my very own. I was wondering do you cut your paper or do you have it cut for you? If you do your own, what do you use to cut it? Thanks!
Monday, July 16, 2007
First off, thank you for the feedback, and I'm glad that you find my blog so helpful! I do hope you find a class or a workshop near you so you get some instruction on letterpress before plunging in!
On to paper cutting. So this is not quite as simple of an answer as you would think. I try to take the lazy approach and buy pre-cut paper and cardstock, like the Fabriano, Arturo, and Paper Source cards. But every now and then, it's necessary to get the paper cut down to size. When it's a professional job that I want to have exact cuts on, I take it to a professional place. Kelly Paper charges a flat charge of $15 to cut parent sheets down to whatever size(s) you want. But that means you have to buy the paper from Kelly Paper. Kinko's charges $1.49 or something per cut per 100 sheets, and so far, they've been the best and cheapest to work with. But every Kinko's is different, so tread carefully. Do a test cut order first. It'll be worth the $5 to make sure that they can actually cut and follow directions. I had half of a ream of 220lb cardstock ruined by Office Max's Impress, and I guarantee I will NEVER be going back there to cut paper.
For smaller cutting jobs or jobs where I don't need exact precision, I use my 12" x 12" paper trimmer, which is a guillotine style trimmer. For the larger sheets, I go to Kinko's, where they have a large rotary trimmer set out for customers to use, or to my local art center/school, where they generally have larger paper trimmers set out for students to use.
I hope this helps!
My Newest Project
Here is my latest wedding invitation project! It's still in pre-approval stages, but I just thought you might want to see what I'm currently working on. The bride decided on a lovely sage colored square enclosure card to work with.

I'll keep you updated as I work on this further!

I'll keep you updated as I work on this further!
Thursday, July 19, 2007
The Lowdown on My First Wedding Invitation Project
Okay, so I told you awhile ago that I would blog on the process of making my first set of wedding invitations. The design was based on my good friend's wedding dress, which you can find on the previous blog post about it.
STEP 1: Turquoise
We had previously chosen two Pantone swatches to use, but when I mixed the original Pantone color we decided on, I found it too blue for the design's color scheme. So I mixed it to PMS #3268.
Setting the custom die made by Owosso Graphic in the chase, I started on the first color:
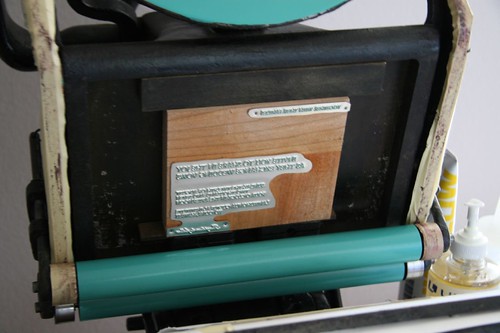
I printed the lettering in the turquoise color. The bride chose to print this on luxe glass, which is a beautiful paper with just a touch of green color. I also printed this on Crane's Lettra to test it out, just to see. More on that in a later post. Here are the results of the first color run:
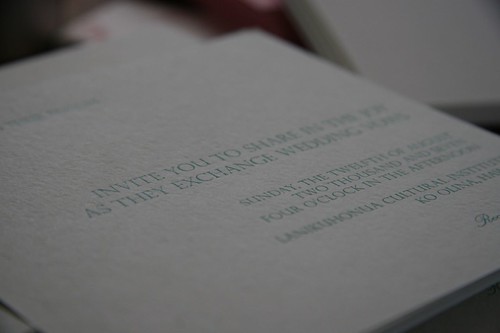
STEP 2: Purple
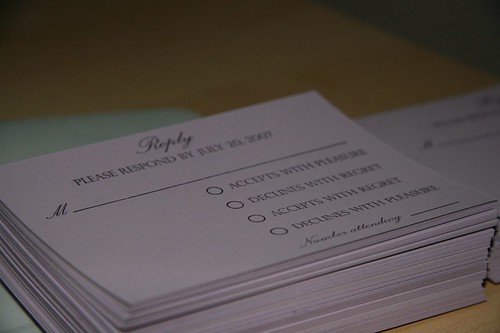
My second run was purple. And third. And fourth. I used PMS #259. Everything else was being printed in the purple, so a whole week was taken up by purple. The next thing that I printed were the reply cards. The bride and groom wanted some "humorous" reply cards in addition to regular reply cards for those that they were afraid would be offended by the reply card. Here was their special reply card:
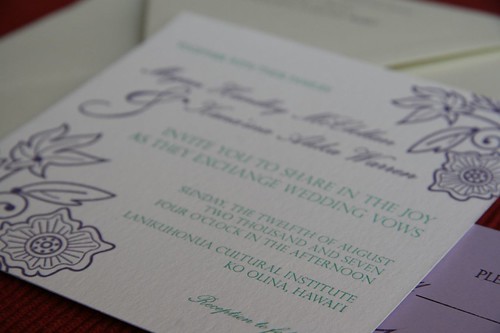
While that was drying, I started on the purple onto the invitation. I did their names and top flower design and the bottom design in separate runs. The press is small, so I wasn't able to do both the top and the bottom purple printed areas at the same time. Here is the completed invitation, on Crane's Lettra:
I then used the same die from the bottom right corner to finish the reply cards. I then did the envelopes, also in purple. Again, to save a bit of money for the couple, I used the same address die for both the reply envelopes and the outer envelope's return address. Here is the completed set pre assembly (note, the invitation here is on the Lettra, not on the luxe glass that the actual invitations are on):
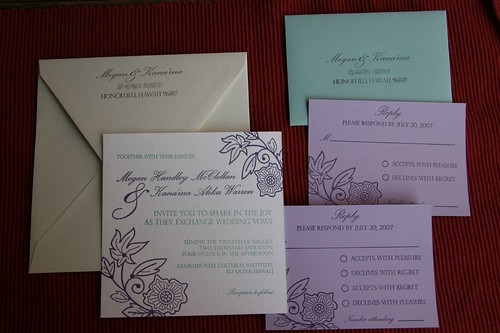
We got the invitation back in the mail last week all completely assembled. I haven't had a chance to take pictures with everything going on here, so definitely stay tuned for those pics. Also, I'm helping my friends Katie and Brandon out with their invitations, so I'll be sure to take more pictures as I do those!
STEP 1: Turquoise
We had previously chosen two Pantone swatches to use, but when I mixed the original Pantone color we decided on, I found it too blue for the design's color scheme. So I mixed it to PMS #3268.
Setting the custom die made by Owosso Graphic in the chase, I started on the first color:
I printed the lettering in the turquoise color. The bride chose to print this on luxe glass, which is a beautiful paper with just a touch of green color. I also printed this on Crane's Lettra to test it out, just to see. More on that in a later post. Here are the results of the first color run:
STEP 2: Purple
My second run was purple. And third. And fourth. I used PMS #259. Everything else was being printed in the purple, so a whole week was taken up by purple. The next thing that I printed were the reply cards. The bride and groom wanted some "humorous" reply cards in addition to regular reply cards for those that they were afraid would be offended by the reply card. Here was their special reply card:
While that was drying, I started on the purple onto the invitation. I did their names and top flower design and the bottom design in separate runs. The press is small, so I wasn't able to do both the top and the bottom purple printed areas at the same time. Here is the completed invitation, on Crane's Lettra:
I then used the same die from the bottom right corner to finish the reply cards. I then did the envelopes, also in purple. Again, to save a bit of money for the couple, I used the same address die for both the reply envelopes and the outer envelope's return address. Here is the completed set pre assembly (note, the invitation here is on the Lettra, not on the luxe glass that the actual invitations are on):
We got the invitation back in the mail last week all completely assembled. I haven't had a chance to take pictures with everything going on here, so definitely stay tuned for those pics. Also, I'm helping my friends Katie and Brandon out with their invitations, so I'll be sure to take more pictures as I do those!
Tuesday, July 10, 2007
Technical Difficulties
My computer is brain dead. The customer support has determined that my hard drive has "failed." Which means it's dead. Along with it goes the new website (some of it) that I had been building, my upcoming designs (all of it), my accounting books, my digital photographs, among other things. I'm pondering data recovery and how much that will cost.
I should have used the back up drive that I have more often (like nightly). Sigh.
At least all my letterpress pictures are up on flickr. And all of my potential clients' emails are on Gmail.
Potential clients waiting to see the new designs, please pardon the inconvenience while I curse Dell for selling faulty products. I will get designs to you as soon as I can. At least their warranty service is pretty good.
I should have used the back up drive that I have more often (like nightly). Sigh.
At least all my letterpress pictures are up on flickr. And all of my potential clients' emails are on Gmail.
Potential clients waiting to see the new designs, please pardon the inconvenience while I curse Dell for selling faulty products. I will get designs to you as soon as I can. At least their warranty service is pretty good.
Wednesday, June 27, 2007
A card for Beth...
I saw the cute racehorse dingbats in the drawer and the letterpress class and decided to set them for my good friend and long time client Beth. The font is, fittingly, Cowboy 24 point in a salmon color on Fabriano card and envelope stock. I set the envelope with two of the horses in front and one trailing, as if in an actual race.


Wedding Invitations Done!
I finished my first set of wedding invitations on the letterpress! This was a custom design collaboration between the bride, my husband, and me. The bride wanted to replicate the floral design on her wedding dress on the invitations. Using the picture below, I drew out a stylized design for my husband to create digitally.

And here is a sneak preview of what the final invitation looks like. I will put the whole invitation set up for your perusal in a bit. The images I have are pre-assembly. The bride bought the enclosures for the invitations and will be assembling them herself.
 I learned a lot throughout this whole process. I have pictures that I took while I was making these lovely invites, and I'll be posting those shortly as well. Enjoy!

And here is a sneak preview of what the final invitation looks like. I will put the whole invitation set up for your perusal in a bit. The images I have are pre-assembly. The bride bought the enclosures for the invitations and will be assembling them herself.

Wednesday, June 13, 2007
More Linoleum Cuts!
For the last couple weeks of letterpress class, I decided I wanted to do printing on the Vandercook, since I don't have one. Which meant more linoleum prints! Here are my last two linoleum block projects:
DEER
DEER
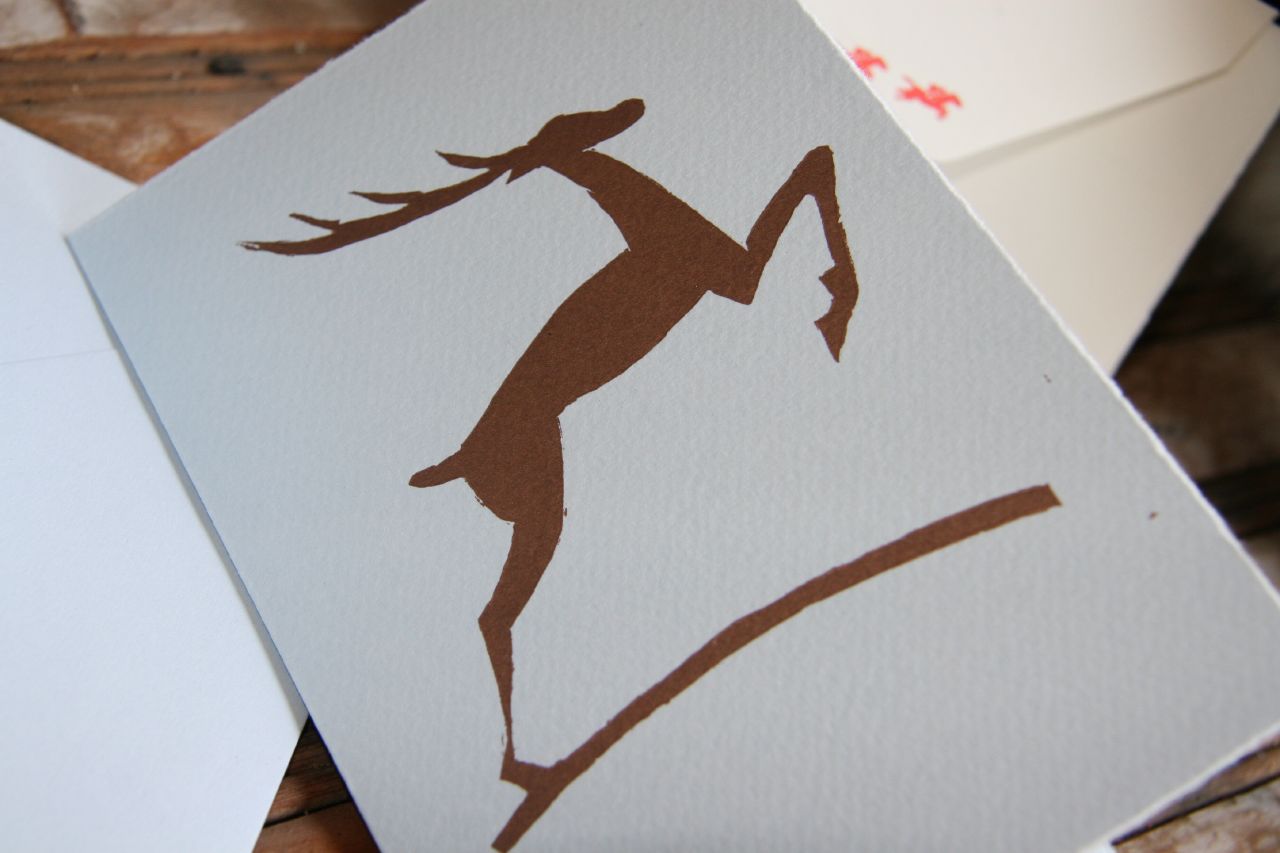
This is meant to be a holiday card. Originally the image had stars on it, which I tried to keep on the linoleum bloc, but clumsiness marred two of the stars, so I think if I put stars on later, I will do it with some dingbats. I had wanted to do a silver or gold originally, but since in class we have to share the machine, we agreed on a metallic copper color (PMS 8560). It came out beautifully on the light blue card, and the color was gorgeous on my friend Carrie's blush colored card as well (she had a linoleum cut of a french bulldog sillhouette). I made a matching envelope for this that I haven't had a chance to photograph yet.
AUSTRALIAN SHEPHERD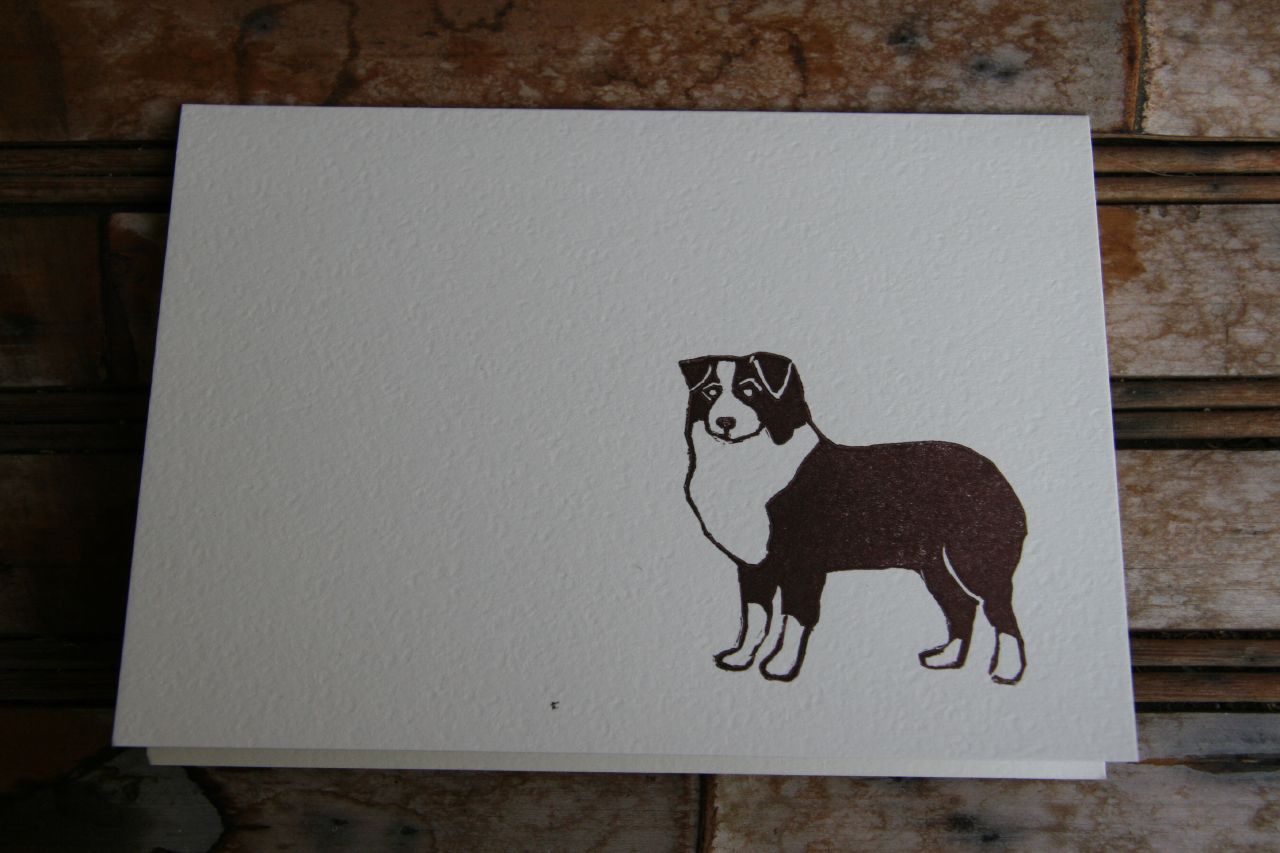 Romeo was jealous of the fact that I made a card with Jezebel on it, I carved an image of an Australian shepherd and printed it. I had wanted to do it in a blue or grey color to match Romeo, but brown was the color of the day on the Vandercook, so brown it was! The fine lines on this came out really well, and I'm very pleased with how it looks. I use a number of different Exacto blades for the fine lines, but I know some people just use the regular carving tools and they come out just dandy.
I am going to attempt to print linoleum blocks on my Golding in the near future, in between these wedding projects. I've gotten pieces of advice on how to do this. I'll let you know how it turns out!
Wednesday, June 6, 2007
Cleaning Up Ink on the Cat...
At a party recently, one of my guests remarked how amazing it was that the cats didn't get into my letterpress setup. Talk about foreshadowing! Monday night while I was printing, Jezebel jumped up onto the letterpress desk and started poking around. Of course, I shooed her away, but not before her tail and paw got a bunch of rubber-based ink on it. DISASTER! Printing was abandoned and chasing the cat down ensued.
My cleaning setup is as toxic-low as I can make it. I use canola oil to clean ink off of the press and equipment, and I follow up with just a bit of California Wash to take off the oil residue. Every now and then I use Putz Pomade to condition my rubber rollers and I always use the California Wash on the plates, but other than that, it's mostly just cooking oil. Honestly, I mostly use the California Wash on my hands to get off ink blotches that don't easily come off with soap or oil.
But how do you get rubber based ink off of a cat? That is NOT something that is generally covered by letterpress discussion lists, blogs, or in class, and I wasn't about to use California Wash or mineral spirits on the cat. Neither is "how to get rubber-based ink off our pet's fur" a general resource on any vet website. One option that I offered up immediately was to shave her, but that didn't sit well with my husband. So here's the what we did to clean off our poor cat:
At first, we thought the only part of dear Jezebel that got inked was her front paw, so we doused it with canola oil and rubbed it in good. Then we followed it up with some good old fashioned Dawn dishwashing soap (I figured, if it is good enough to clean crude oil off of wild animals, it's good enough to take off diluted rubber based ink and canola oil off of my cat). While we were rubbing the Dawn in, Joel asked where all the ink stains on my pants were coming from. Jezebel then got a thorough rubdown while we looked for the source. Now, she's a black cat and I was using dark purple ink, so it wasn't very apparent where exactly the ink was. We figured out that it was somewhere on her tail and the rubbing in of canola oil and then Dawn continued on poor Jezebel's tail. After we finished with the oil and Dawn, Jezebel got dunked into a bathroom sink filled with warm water. We did this twice, and the purple ink with this treatment came right off once we figured out where exactly it was. Jezebel got her first bath ever. She's well and feisty, and she won't let us anywhere near her scraggly tail to brush it out.
My cleaning setup is as toxic-low as I can make it. I use canola oil to clean ink off of the press and equipment, and I follow up with just a bit of California Wash to take off the oil residue. Every now and then I use Putz Pomade to condition my rubber rollers and I always use the California Wash on the plates, but other than that, it's mostly just cooking oil. Honestly, I mostly use the California Wash on my hands to get off ink blotches that don't easily come off with soap or oil.
But how do you get rubber based ink off of a cat? That is NOT something that is generally covered by letterpress discussion lists, blogs, or in class, and I wasn't about to use California Wash or mineral spirits on the cat. Neither is "how to get rubber-based ink off our pet's fur" a general resource on any vet website. One option that I offered up immediately was to shave her, but that didn't sit well with my husband. So here's the what we did to clean off our poor cat:
At first, we thought the only part of dear Jezebel that got inked was her front paw, so we doused it with canola oil and rubbed it in good. Then we followed it up with some good old fashioned Dawn dishwashing soap (I figured, if it is good enough to clean crude oil off of wild animals, it's good enough to take off diluted rubber based ink and canola oil off of my cat). While we were rubbing the Dawn in, Joel asked where all the ink stains on my pants were coming from. Jezebel then got a thorough rubdown while we looked for the source. Now, she's a black cat and I was using dark purple ink, so it wasn't very apparent where exactly the ink was. We figured out that it was somewhere on her tail and the rubbing in of canola oil and then Dawn continued on poor Jezebel's tail. After we finished with the oil and Dawn, Jezebel got dunked into a bathroom sink filled with warm water. We did this twice, and the purple ink with this treatment came right off once we figured out where exactly it was. Jezebel got her first bath ever. She's well and feisty, and she won't let us anywhere near her scraggly tail to brush it out.
Subscribe to:
Posts (Atom)
