Monday, August 6, 2007
Chocolate Brown Run
The Chocolate Brown run is done for the night! And I'm done as well! Hopefully I will have the strength (and time!) tomorrow to tell you more and post some pictures.
Me at my press
So usually you won't see pictures like this, because I'm usually the one taking pictures of my work. And since I'm deathly afraid of getting ink all over the camera, it's rare for me to have pictures taken during the process of making the cards. But my husband was home yesterday, and he happened to catch some of the action while I was doing the sage run.
Sunday, August 5, 2007
Another Day, Another Press Run!
So for the second day in a row, I was printing on my letterpress from mid-afternoon into the night. It's around 1AM now and I am just putting my feet up for a moment before cleaning the press off. Whew!
Today I did just one color -- Paper Source's sage on Crane's Lettra for the wedding invitations that I'm working on right now. I've learned a couple lessons on setting the platen that I'll share with you once I get the second color on -- it'll be easier to see what I've devised in the chocolate brown ink I'm doing next.
But let me just say a word or two about Crane's Lettra. Every other letterpress blog has been raving about Lettra, but I was hesitant because, well, how could it be better than handmade paper? This is the first project I've really worked with the Lettra stock, and WOW I'm impressed with the results. The paper is super soft with a very nice texture, and it takes impression so well I'm only sorry I didn't figure this out sooner. And for the price, it's so worth it.
Now, back to the press to clean it off for the night so I can start bright and early in the morning! Pictures of the project soon, I promise!
Today I did just one color -- Paper Source's sage on Crane's Lettra for the wedding invitations that I'm working on right now. I've learned a couple lessons on setting the platen that I'll share with you once I get the second color on -- it'll be easier to see what I've devised in the chocolate brown ink I'm doing next.
But let me just say a word or two about Crane's Lettra. Every other letterpress blog has been raving about Lettra, but I was hesitant because, well, how could it be better than handmade paper? This is the first project I've really worked with the Lettra stock, and WOW I'm impressed with the results. The paper is super soft with a very nice texture, and it takes impression so well I'm only sorry I didn't figure this out sooner. And for the price, it's so worth it.
Now, back to the press to clean it off for the night so I can start bright and early in the morning! Pictures of the project soon, I promise!
Saturday, August 4, 2007
Letterpress Coasters - Round 1 of printing
So I haven't been doing much printing lately. Frankly there's been a lot of personal issues. But today was back to the press, and with some great results.
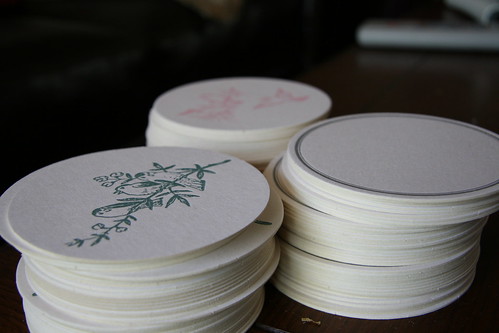
My friend Carrie had gotten a bunch of coasters, and she gave me some to try out. I finally decided to make the coasters a gift for a friend and a vintage-y bird motif as one of Joie's inaugural etsy items.
Today I did three different colors on the press! These are just the first run of each coaster - none are complete, but I thought I would give you a sneak preview:

If you want to see more, I've put the pics up on my flickr page. Enjoy!
My friend Carrie had gotten a bunch of coasters, and she gave me some to try out. I finally decided to make the coasters a gift for a friend and a vintage-y bird motif as one of Joie's inaugural etsy items.
Today I did three different colors on the press! These are just the first run of each coaster - none are complete, but I thought I would give you a sneak preview:
If you want to see more, I've put the pics up on my flickr page. Enjoy!
Wednesday, August 1, 2007
Questions on Custom Plates for Letterpress
I've had these two questions on my blog recently about custom letterpress dies:
Why did you decide to use plates instead of handsetting the type? I was given some type when I bought my Pilot press but I am thinking of trying out the plates. It definitely seems like the easier way to get more font choices. Plus no dropped trays. (my biggest nightmare/fear)
What kind of die cuts are those? They don't look photopolymer. Do you have good success with them?
To answer these questions, first, let me address handsetting type. I don't generally handset type because, first and foremost, I don't have a lot of room to keep a wide variety of type in different sizes and fonts. Secondly, it costs a lot of money to amass the collection of type that I would want to do the things I do right now. Third, it would take forever to set and reset type on the whim of my clients. Fourth, it's a lot easier to have a custom plate made. Fifth, there are some designs that I use and that I create that are not available, so I need to make custom plates for those. Sixth, setting type is a labor of love, and while I like to do it, I would do it only for personal projects because of the time and effort it takes to handset type.
Platemaking is fairly inexpensive, although in the long run you do pay for the convenience. With type, it's a one time charge per font face and size. But I get exactly the layout and type I want, I can send electronic proofs for clients to look at and revise before I get started, and once it's done, I have the option of giving the plates to my clients for safekeeping in case I run out of room.
I don't use photopolymer plates. When I first looked into them, I didn't quite understand them (still don't, really, although I hear they are easy) and the base and photopolymer plates seemed more expensive than what I was already using. Although photopolymer plates are easier to store and you can cut them up and reset them in any number of combinations, I have heard that the impressions aren't as good as with metal plates and they degrade much faster than their metal counterparts.
I use 16 gauge magnesium plates mounted type-high on wood from Owosso Graphic Arts (see their link in the sidebar on the right). They have a same day turnaround, and through Priority Mail, I usually get the plates 3 or 4 days after I send them the digital file. I've been very happy with Owosso's service and pricing, and, as the saying goes, if it ain't broke, don't fix it!
Why did you decide to use plates instead of handsetting the type? I was given some type when I bought my Pilot press but I am thinking of trying out the plates. It definitely seems like the easier way to get more font choices. Plus no dropped trays. (my biggest nightmare/fear)
What kind of die cuts are those? They don't look photopolymer. Do you have good success with them?
To answer these questions, first, let me address handsetting type. I don't generally handset type because, first and foremost, I don't have a lot of room to keep a wide variety of type in different sizes and fonts. Secondly, it costs a lot of money to amass the collection of type that I would want to do the things I do right now. Third, it would take forever to set and reset type on the whim of my clients. Fourth, it's a lot easier to have a custom plate made. Fifth, there are some designs that I use and that I create that are not available, so I need to make custom plates for those. Sixth, setting type is a labor of love, and while I like to do it, I would do it only for personal projects because of the time and effort it takes to handset type.
Platemaking is fairly inexpensive, although in the long run you do pay for the convenience. With type, it's a one time charge per font face and size. But I get exactly the layout and type I want, I can send electronic proofs for clients to look at and revise before I get started, and once it's done, I have the option of giving the plates to my clients for safekeeping in case I run out of room.
I don't use photopolymer plates. When I first looked into them, I didn't quite understand them (still don't, really, although I hear they are easy) and the base and photopolymer plates seemed more expensive than what I was already using. Although photopolymer plates are easier to store and you can cut them up and reset them in any number of combinations, I have heard that the impressions aren't as good as with metal plates and they degrade much faster than their metal counterparts.
I use 16 gauge magnesium plates mounted type-high on wood from Owosso Graphic Arts (see their link in the sidebar on the right). They have a same day turnaround, and through Priority Mail, I usually get the plates 3 or 4 days after I send them the digital file. I've been very happy with Owosso's service and pricing, and, as the saying goes, if it ain't broke, don't fix it!
Monday, July 30, 2007
Getting Serious...
So I'm on a drive to get my business jumpstarted. I've really been dilly-dallying for too long. Among the things I want to finish by the first week of August are the website and the designs and product list for ready-made products to be sold online and at craft fairs. I also need to send in (TODAY!) the last bits of paperwork to set Joie Studio up as a business. My goal is to hit the ground running by the end of August with products online to sell, a small line of customizable wedding invitations and announcements, and a game plan to take me through the upcoming holiday season.
Definitely one of the things I want to highlight and promote are wedding packages that include both letterpressed invitations and a wedding website.
Some of the things I'm pondering right now is how exactly I should set up my online shop and how many customizable products I should have, if any. I'm also wondering what kind of promotion I should do to get the word out and if I should go to any local craft fairs to not only sell my wares, but advertise my custom work as well!
Please feel free to comment on what items you would like to see me sell, any business advice, and any craft shows in the LA area that you absolutely think I need to be at to sell my letterpress paper goods!
Definitely one of the things I want to highlight and promote are wedding packages that include both letterpressed invitations and a wedding website.
Some of the things I'm pondering right now is how exactly I should set up my online shop and how many customizable products I should have, if any. I'm also wondering what kind of promotion I should do to get the word out and if I should go to any local craft fairs to not only sell my wares, but advertise my custom work as well!
Please feel free to comment on what items you would like to see me sell, any business advice, and any craft shows in the LA area that you absolutely think I need to be at to sell my letterpress paper goods!
Friday, July 20, 2007
Question About Paper Cutting
I recently saw this comment on my blog:
Anonymous said...
Your blog has been so helpful to me. Because of this blog and your helpful examples I have finally decided to take the plunge and buy a press of my very own. I was wondering do you cut your paper or do you have it cut for you? If you do your own, what do you use to cut it? Thanks!
Monday, July 16, 2007
First off, thank you for the feedback, and I'm glad that you find my blog so helpful! I do hope you find a class or a workshop near you so you get some instruction on letterpress before plunging in!
On to paper cutting. So this is not quite as simple of an answer as you would think. I try to take the lazy approach and buy pre-cut paper and cardstock, like the Fabriano, Arturo, and Paper Source cards. But every now and then, it's necessary to get the paper cut down to size. When it's a professional job that I want to have exact cuts on, I take it to a professional place. Kelly Paper charges a flat charge of $15 to cut parent sheets down to whatever size(s) you want. But that means you have to buy the paper from Kelly Paper. Kinko's charges $1.49 or something per cut per 100 sheets, and so far, they've been the best and cheapest to work with. But every Kinko's is different, so tread carefully. Do a test cut order first. It'll be worth the $5 to make sure that they can actually cut and follow directions. I had half of a ream of 220lb cardstock ruined by Office Max's Impress, and I guarantee I will NEVER be going back there to cut paper.
For smaller cutting jobs or jobs where I don't need exact precision, I use my 12" x 12" paper trimmer, which is a guillotine style trimmer. For the larger sheets, I go to Kinko's, where they have a large rotary trimmer set out for customers to use, or to my local art center/school, where they generally have larger paper trimmers set out for students to use.
I hope this helps!
Anonymous said...
Your blog has been so helpful to me. Because of this blog and your helpful examples I have finally decided to take the plunge and buy a press of my very own. I was wondering do you cut your paper or do you have it cut for you? If you do your own, what do you use to cut it? Thanks!
Monday, July 16, 2007
First off, thank you for the feedback, and I'm glad that you find my blog so helpful! I do hope you find a class or a workshop near you so you get some instruction on letterpress before plunging in!
On to paper cutting. So this is not quite as simple of an answer as you would think. I try to take the lazy approach and buy pre-cut paper and cardstock, like the Fabriano, Arturo, and Paper Source cards. But every now and then, it's necessary to get the paper cut down to size. When it's a professional job that I want to have exact cuts on, I take it to a professional place. Kelly Paper charges a flat charge of $15 to cut parent sheets down to whatever size(s) you want. But that means you have to buy the paper from Kelly Paper. Kinko's charges $1.49 or something per cut per 100 sheets, and so far, they've been the best and cheapest to work with. But every Kinko's is different, so tread carefully. Do a test cut order first. It'll be worth the $5 to make sure that they can actually cut and follow directions. I had half of a ream of 220lb cardstock ruined by Office Max's Impress, and I guarantee I will NEVER be going back there to cut paper.
For smaller cutting jobs or jobs where I don't need exact precision, I use my 12" x 12" paper trimmer, which is a guillotine style trimmer. For the larger sheets, I go to Kinko's, where they have a large rotary trimmer set out for customers to use, or to my local art center/school, where they generally have larger paper trimmers set out for students to use.
I hope this helps!
My Newest Project
Thursday, July 19, 2007
The Lowdown on My First Wedding Invitation Project
Okay, so I told you awhile ago that I would blog on the process of making my first set of wedding invitations. The design was based on my good friend's wedding dress, which you can find on the previous blog post about it.
STEP 1: Turquoise
We had previously chosen two Pantone swatches to use, but when I mixed the original Pantone color we decided on, I found it too blue for the design's color scheme. So I mixed it to PMS #3268.
Setting the custom die made by Owosso Graphic in the chase, I started on the first color:
I printed the lettering in the turquoise color. The bride chose to print this on luxe glass, which is a beautiful paper with just a touch of green color. I also printed this on Crane's Lettra to test it out, just to see. More on that in a later post. Here are the results of the first color run:
STEP 2: Purple
My second run was purple. And third. And fourth. I used PMS #259. Everything else was being printed in the purple, so a whole week was taken up by purple. The next thing that I printed were the reply cards. The bride and groom wanted some "humorous" reply cards in addition to regular reply cards for those that they were afraid would be offended by the reply card. Here was their special reply card:
While that was drying, I started on the purple onto the invitation. I did their names and top flower design and the bottom design in separate runs. The press is small, so I wasn't able to do both the top and the bottom purple printed areas at the same time. Here is the completed invitation, on Crane's Lettra:
I then used the same die from the bottom right corner to finish the reply cards. I then did the envelopes, also in purple. Again, to save a bit of money for the couple, I used the same address die for both the reply envelopes and the outer envelope's return address. Here is the completed set pre assembly (note, the invitation here is on the Lettra, not on the luxe glass that the actual invitations are on):
We got the invitation back in the mail last week all completely assembled. I haven't had a chance to take pictures with everything going on here, so definitely stay tuned for those pics. Also, I'm helping my friends Katie and Brandon out with their invitations, so I'll be sure to take more pictures as I do those!
STEP 1: Turquoise
We had previously chosen two Pantone swatches to use, but when I mixed the original Pantone color we decided on, I found it too blue for the design's color scheme. So I mixed it to PMS #3268.
Setting the custom die made by Owosso Graphic in the chase, I started on the first color:
I printed the lettering in the turquoise color. The bride chose to print this on luxe glass, which is a beautiful paper with just a touch of green color. I also printed this on Crane's Lettra to test it out, just to see. More on that in a later post. Here are the results of the first color run:
STEP 2: Purple
My second run was purple. And third. And fourth. I used PMS #259. Everything else was being printed in the purple, so a whole week was taken up by purple. The next thing that I printed were the reply cards. The bride and groom wanted some "humorous" reply cards in addition to regular reply cards for those that they were afraid would be offended by the reply card. Here was their special reply card:
While that was drying, I started on the purple onto the invitation. I did their names and top flower design and the bottom design in separate runs. The press is small, so I wasn't able to do both the top and the bottom purple printed areas at the same time. Here is the completed invitation, on Crane's Lettra:
I then used the same die from the bottom right corner to finish the reply cards. I then did the envelopes, also in purple. Again, to save a bit of money for the couple, I used the same address die for both the reply envelopes and the outer envelope's return address. Here is the completed set pre assembly (note, the invitation here is on the Lettra, not on the luxe glass that the actual invitations are on):
We got the invitation back in the mail last week all completely assembled. I haven't had a chance to take pictures with everything going on here, so definitely stay tuned for those pics. Also, I'm helping my friends Katie and Brandon out with their invitations, so I'll be sure to take more pictures as I do those!
Tuesday, July 10, 2007
Technical Difficulties
My computer is brain dead. The customer support has determined that my hard drive has "failed." Which means it's dead. Along with it goes the new website (some of it) that I had been building, my upcoming designs (all of it), my accounting books, my digital photographs, among other things. I'm pondering data recovery and how much that will cost.
I should have used the back up drive that I have more often (like nightly). Sigh.
At least all my letterpress pictures are up on flickr. And all of my potential clients' emails are on Gmail.
Potential clients waiting to see the new designs, please pardon the inconvenience while I curse Dell for selling faulty products. I will get designs to you as soon as I can. At least their warranty service is pretty good.
I should have used the back up drive that I have more often (like nightly). Sigh.
At least all my letterpress pictures are up on flickr. And all of my potential clients' emails are on Gmail.
Potential clients waiting to see the new designs, please pardon the inconvenience while I curse Dell for selling faulty products. I will get designs to you as soon as I can. At least their warranty service is pretty good.
Subscribe to:
Posts (Atom)